It’s been long overdue… but here it is: Pencil2D release 0.7.0!
We’ve been working on this release for more than two years, a release which packs nearly 500 commits, and boy do we have things to show! A much awaited re-designed camera system, timeline dragging and exposure improvements, adjustable layer opacity, repositioning content of multiple frames, perspective grids, and more.
Note: Some of the legacy builds and other packages may not be updated yet, since we depend on external maintainers to finalize the release cycle. If the latest version is not available for your current OS or system architecture please be patient and follow progress on our release plan page.
| Contents |
|---|
| Feature Highlights |
| Enhancements/Changes |
| Known Issues & Gotchas |
| How Can I Help? |
Many thanks to all the people who helped to make this release possible, including:
Chchwy - scribblemaniac - MrStevns - Davidlamhauge - Josemoreno - J5lx - iynaur - aeroc7 - donarturo11 - anpanring - musicinmybrain - CSinclair89 - Fatih20 - HeCorr
Feature Highlights
Icon Redesign (#1356, #1361)
Thanks to the efforts of Fatih20 and MrStevns, this version comes with a brand new icon set that, unlike before, features a consistent design throughout the entire application! Make sure to check out our behind the scenes blog post to learn more about the work that went into this redesign.
| Old | New |
|---|---|
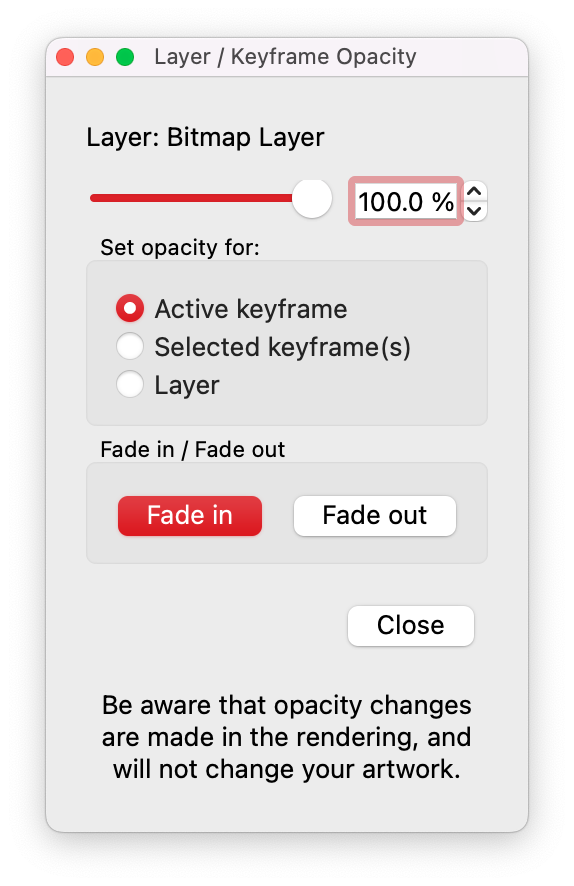
Adjustable Layer/Keyframe Opacity (#1355, #459)
Back in 2020, David Lamhauge made a proposal on how to adjust the opacity of keyframes and whole layers, which has always been a much requested feature. The proposal made it into our master branch on the 10 of March 2021. This feature can be accessed by going to the “Layer” dropdown in the top menu, and then to “Layer / Keyframe opacity”.
Opacity
When you open the window, you have a few options to choose from, giving you more control over how you can change the opacity of one or more keyframes.
- Active keyframe: Change the opacity of the current keyframe.
- Selected keyframe(s): Change the opacity of one or more selected keyframes.
- Layer: Change the opacity of all keyframes on that specific layer.
Fade In / Fade Out
Imagine a classic scenario where you want to make an item disappear over a few keyframes, previously this required workarounds such as gradually decreasing the alpha value of the brush while drawing. The amount of work that required in Pencil2D made it a non starter… but now it has been greatly simplified!
Start by selecting 3 or more keyframes you want to fade in or out on the timeline, then click on the “Fade in” or “Fade out” button in the Layer opacity window. The fading actions will be applied to the selected frames, regardless of the option you select in the “Set opacity for” section.
The result should be that the selected keyframes go from 100% opacity to 0%, or vice versa.
You can also choose to fade using a relative opacity. Say your last selected frame has an opacity of 50% and you select “fade in”, the following frames will gradually increase their opacity from 50% to 100%. Similarly, when fading out and your first selected frame has an opacity of 50%, it will decrease the opacity from 50% to 0%.
Camera System Makeover (#1584, #1587, #1732, #1738)
The camera system has had a huge makeover. We have added features ranging from an entirely new and better way to interact with the camera to having a wide range of easing options for the interpolated camera motion. A new camera path overlay allows you to visualize and tweak the motion of the camera.
What’s new:
- An object-based camera control system
- Camera control options in the tool panel
- The ability to visualize camera interpolations on the canvas
- A wide range of camera motion easings to choose from
We always try to keep the interface as simple as possible in Pencil2D. As such, there are no new tools you have to learn to use the camera; instead, the existing tools in the toolbox change depending on the layer type.
To interact with the camera, select the Move tool and a keyframe on the camera layer. This will enable you to see the handles of the camera.
Object-Based Interaction
Where the old camera system was a part of the viewport, making it more of a WYSIWYG (what you see is what you get) editor, the new system is object-based. This means you can now modify the camera’s placement, rotation, and size without altering the view.
| Translate | Rotate | Scale |
|---|---|---|
| Moving the camera is as simple as dragging it anywhere within the bounds of its area. | To rotate the camera, click and hold on the top circular handle. Pro tip: if you hold shift while rotating, the camera will snap to angles at regular increments. | To change the perceived size of the camera, click and hold-drag on any of the squared corners. Dragging diagonally outward will make objects seem smaller, while dragging inward will make objects appear larger. |
Camera Tool Options
To house some of the new camera features, we’ve added camera functionalities to the tool Options panel. From the panel, you will be able to reset the camera’s current rotation, translation, and scaling transformations individually or all at once for the currently active keyframe.
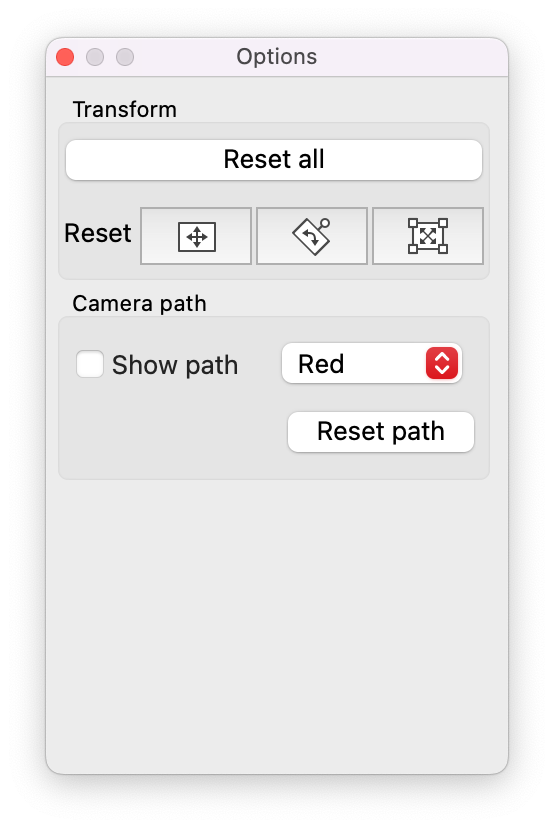
When you click on the Show path checkbox, an entirely new feature will be revealed. You will now be able to see and interact with the camera’s path directly on the canvas.
Onion Skinning
Onion skinning is a vital feature in animation; being able to see what has and what will occur allows the animator to make changes with ease. So we have brought the benefits of onion skinning to camera keyframes, which can be controlled through the Onion Skins panel like you would for onion skins on bitmap or vector layers.
The same customization options for drawing onion skins also apply to the camera onion skins. If you only care about seeing the previous and/or next keyframe, you can enable Show keyframe only, which will hide in-between interpolations. Or if you only want to see the previous keyframe, simply toggle Previous Frames.
To enable interaction with a keyframe path, you first have to scrub to an in-between frame. While the timeline scrubber is at an in-between keyframe, you can change the trajectory between any keyframes. The keyframe path cannot be used to modify keyframes, for that you must scrub to the keyframe you wish to change and then you can manipulate the camera with the move tool.
Camera Easings
Previously, it was only possible to make linear-based movements for the camera which didn’t allow for much flexibility. Often animators use non-linear movements to produce motions that are more dynamic, natural, or stylized. So try experimenting with some of our new easing types such as “In: Slow”, “In: Fast” and or “Out: Faster”.
This feature is currently only possible to access through the timeline by right clicking on camera keyframes. From the menu, you can select from a wide range of easing types to control the movement of the camera. Whether you’re trying to ease in, out, in-out, or out-in, we have you covered. You can see the current easing type at the top of the right-click context menu, as well as near the handle on the canvas when showing the camera path is enabled.
Reposition Content of Multiple Frames (#1325)
This feature allows you to reposition the content of multiple keyframes, across multiple layers.
To access it, locate the “Animation” menu in the top bar, and find the item called “Reposition Selected Frames”.
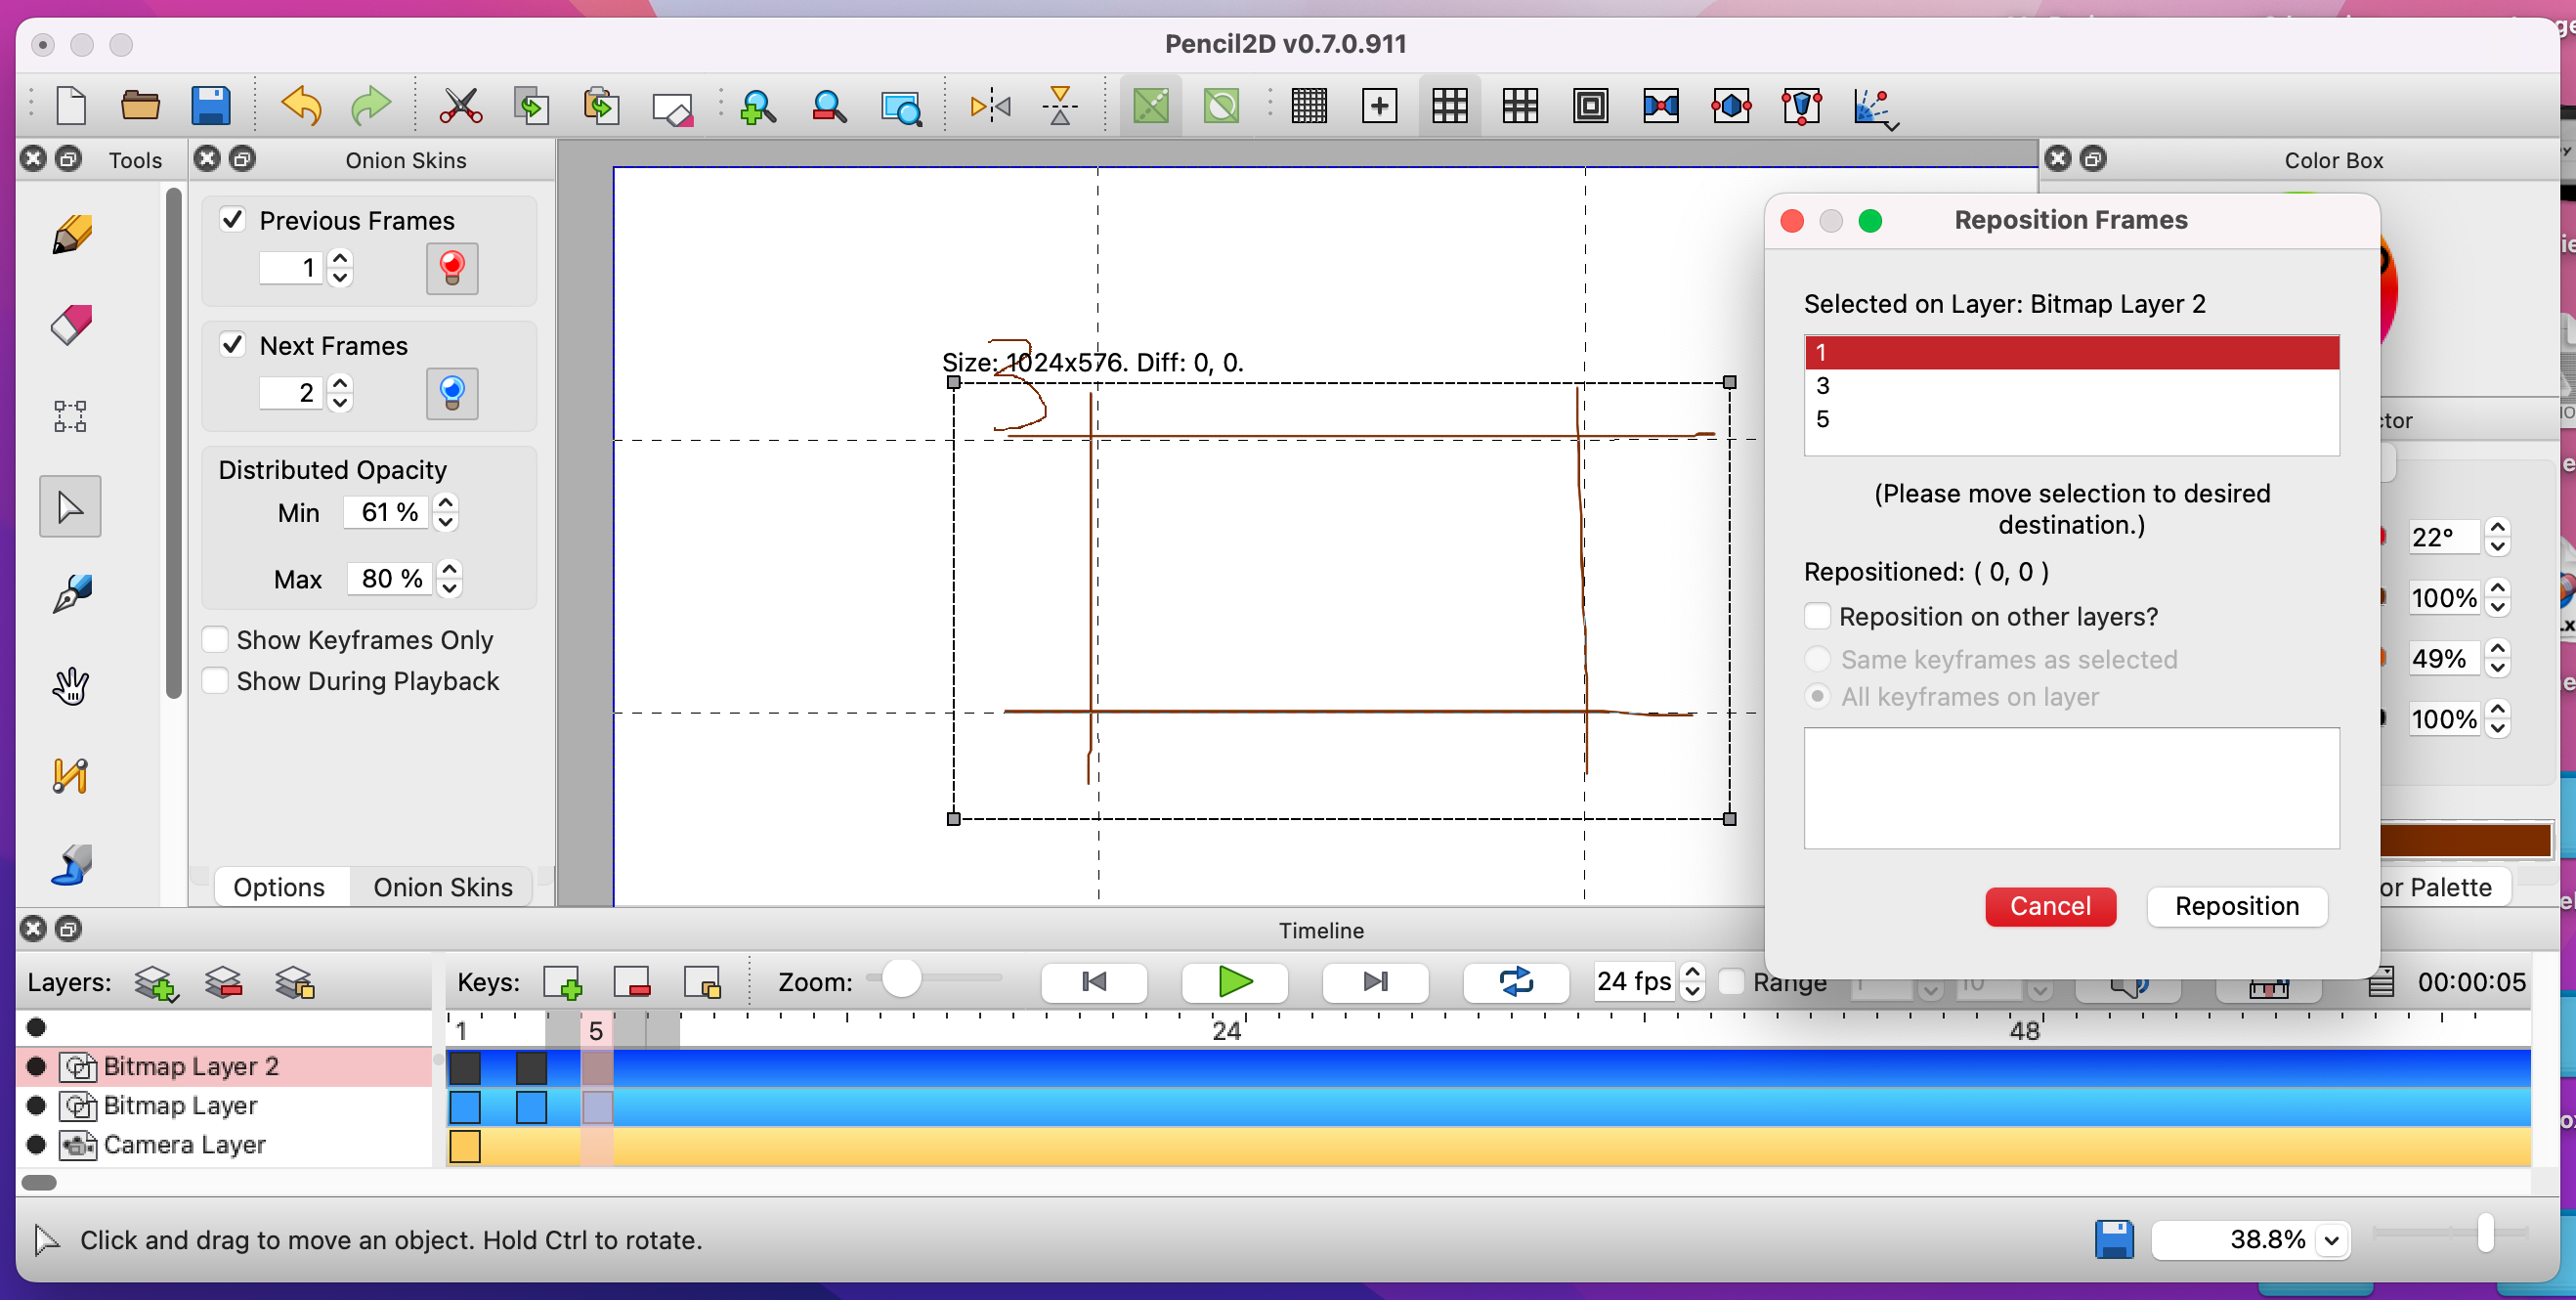
Clicking on the menu item reveals the “Reposition Frames” dialog. The top half of the dialog shows which keyframes are selected. The bottom half makes it possible to reposition keyframes across other layers.
Here’s how it works:
In the video you can see that the content of the keyframe 1 of “Bitmap Layer 2” are being moved from the top left corner, to the bottom left corner and afterwards the same process is being applied to the other keyframes.
Note that because of the limitations of the current undo/redo system, it may not always be possible to undo a repositioning action.
Known issue:
- The cancel button doesn’t work, use the close button in top left/right corner of the popup window depending on the platform.
Timeline Improvements (#1343, #1495)
The timeline logic is one of the oldest parts of Pencil2D, and that can definitely also be seen when you read the code (please don’t). Even so, we’ve managed to improve it and implement some new features.
Increase/Decrease Frame Exposure
Whenever people ask how they can increase or decrease the exposure of a keyframe, there’s never been a straightforward answer. That is because if it’s the last keyframe you want to extend, then you simply place the scrubber further away from that frame and add the next keyframe. However, if you already have the keyframe surrounded by other frames and you want to extend it, then you need to first select all the frames to the right, then move them further away. If you have a several frames you want to move, then it becomes tedious.
As such, we’ve now implemented the ability to increase the exposure of one or more keyframes.
- When you press the Add Exposure action; which can either be triggered by using the configurable shortcut Ctrl + ‘+’ or via the menu item in Animation -> Timeline Selection -> Add Exposure, you increase the exposure of the current frame by moving all the rightmost keys.
- When you’ve made a selection across multiple keyframes and you press the Add Exposure, the exposure of all the keyframes will increase by one.
- You can also select individual keyframes and increase the exposure of only those frames.
- If you wish to decrease the exposure instead, simply use the Subtract Exposure action.
Hollow Scrubber
It’s always been possible to select the keyframe underneath the scrubber, although the UI hasn’t been good at showing that you could do that because the scrubber would cover the entire row. This is no longer the case.
Double-click to Add or Insert a Keyframe
Previously, you’ve only been able to add keyframes to the timeline through the Add keyframe button, which also required you to first place the scrubber on the respective key.
With this new feature however, that is no longer necessary. Instead, you simply hover over the frame where you want the keyframe to be placed, then double-click, which will move the scrubber to that frame and add a keyframe to it. If you double click on an existing keyframe, a new keyframe will be added next to it, pushing other keyframes to the right if necessary.
Known Issue:
- Trying to select and move a single keyframe can trigger this behavior unintentionally. The next version of Pencil2D will address this issue and make it easier to move keyframes again.
Copy/Paste Keyframes
This is such a basic feature—one you don’t even think about. We’ve come to expect that if you can select something then you should also be able to copy and paste it? Unfortunately this wasn’t the case for a long time, but we can now finally say YES! You can now copy and paste keyframes on the timeline.
A video says more than words though, so without further ado, let’s see it in action!
Wow! What a time to be alive! Jokes aside, there’s still room for improvement. For one, you can’t undo such an action yet. Neither can you delete the keyframes in one go; you can, however, do so through the Animation -> Timeline Selection -> Remove Frames menu. Note that this is not undoable either. We are very close to having a new undo/redo system in place, which will allow us to get that working. More on that in the future.
Dragging Keyframes
Previously, when dragging one or more keyframes on the timeline over other keyframes, the keyframes would be immediately be moved out of the way before you even drop the keyframes. This sometimes led to users swapping keyframes unintentionally.
To prevent this issue, we have reworked how dragging works and is visualized so that it’s more clear what is happening.
Here’s how it works:
As you can see in the video, when you drag a selection the keyframes are lifted slightly and they won’t affect existing keyframes. If you attempt to drop keyframe on top of existing keyframes, the move will be cancelled and you can decide for yourself how you want to handle any keyframes before attempting the move again.
Additional changes
- When removing a keyframe using the Remove Keyframe button, the scrubber will no longer scrub to the previous keyframe automatically.
- Attempting to add a keyframe where one already exists will no longer move it to the next available spot, instead the Keyframe will push other consecutive keyframes to the right to make space for it.
- We now have an action in the top bar to allow a list of selected keyframes to be reversed. You find the action in the Animation menu under Timeline Selection.
- It is now possible to remove selected keyframes, though this cannot be undone yet, as such it’s only an action found in the Timeline Selection sub menu.
Selection/Move Tool Improvements (#1724)
It’s been on our TODO list for a long time but this release is finally where we got around to fix one obnoxious problem about the move tool. The fact that when you rotate a selection, the selection visual itself doesn’t change. Fixing this problem required reworking a lot of the selection logic which also allowed us to fix a bunch of other annoying bugs and improve the user experience.
| Old | New |
|---|---|
Previously if you created and moved a selection, performing certain actions (such as changing the layer) without first deselecting would trigger a popup dialog asking you to apply or cancel the current transformation:
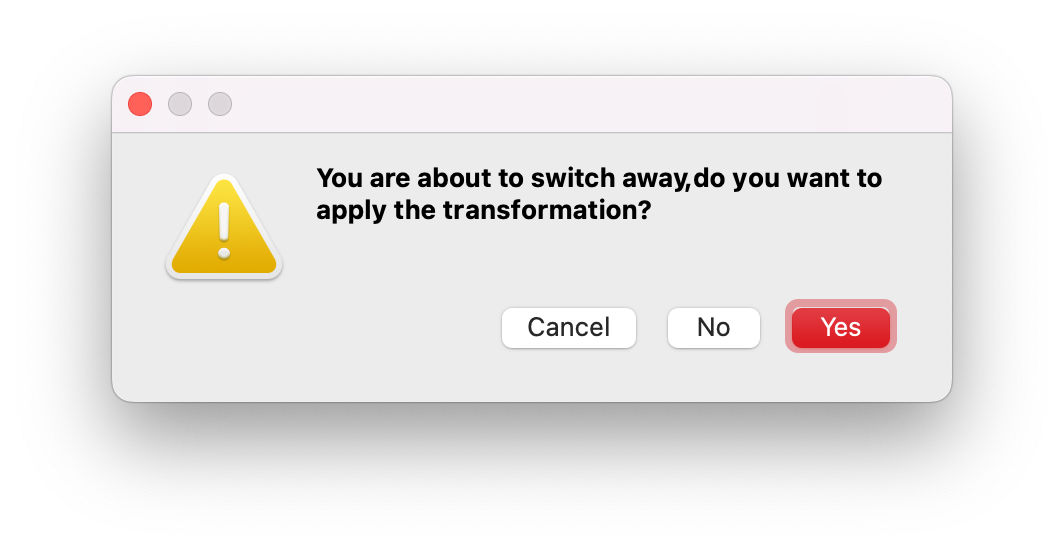
Because of the reworked logic, this is no longer necessary. Instead the changes will automatically be applied when it is necessary to perform a requested action.
In addition to that every transform is now undoable.
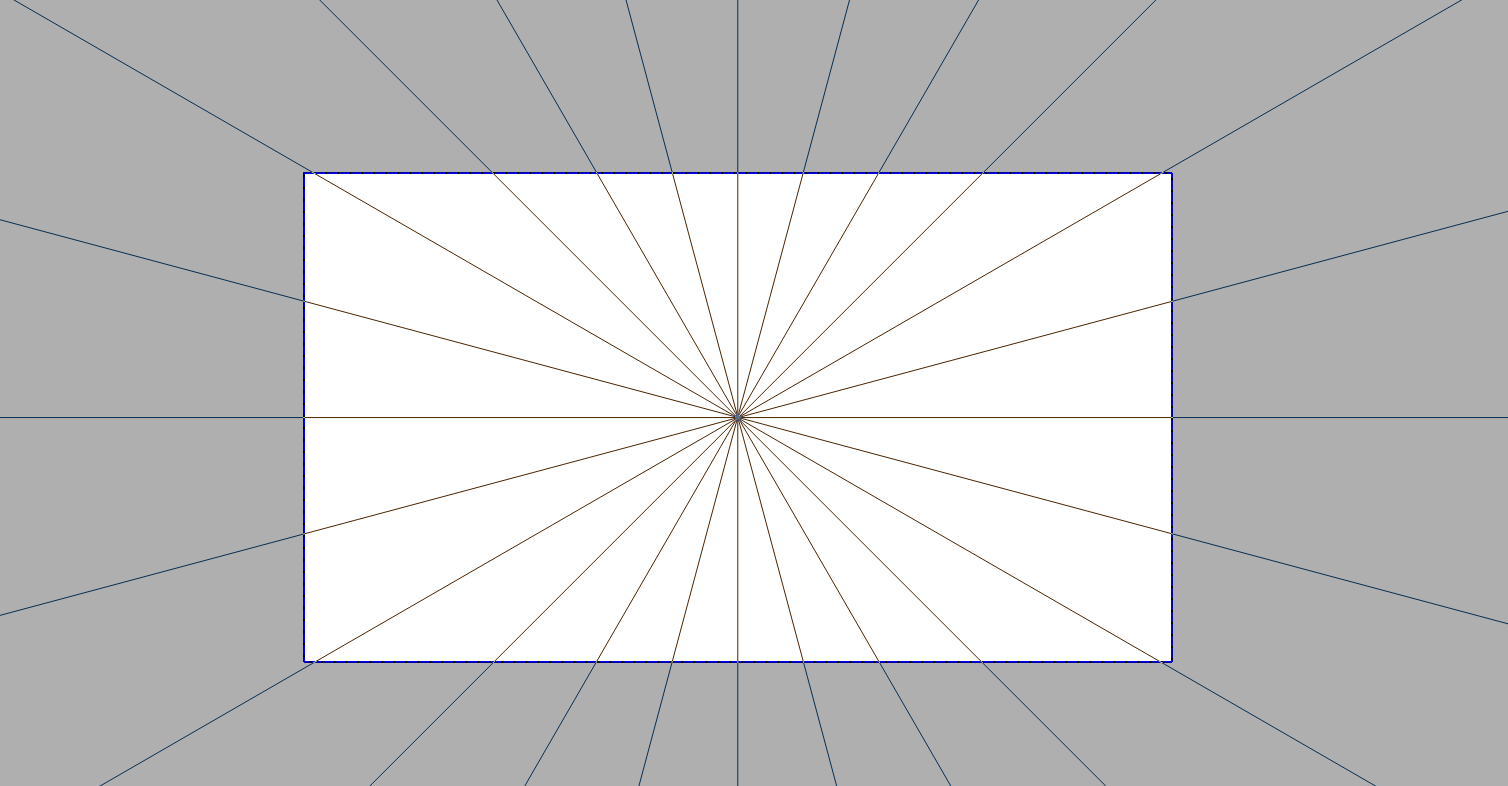
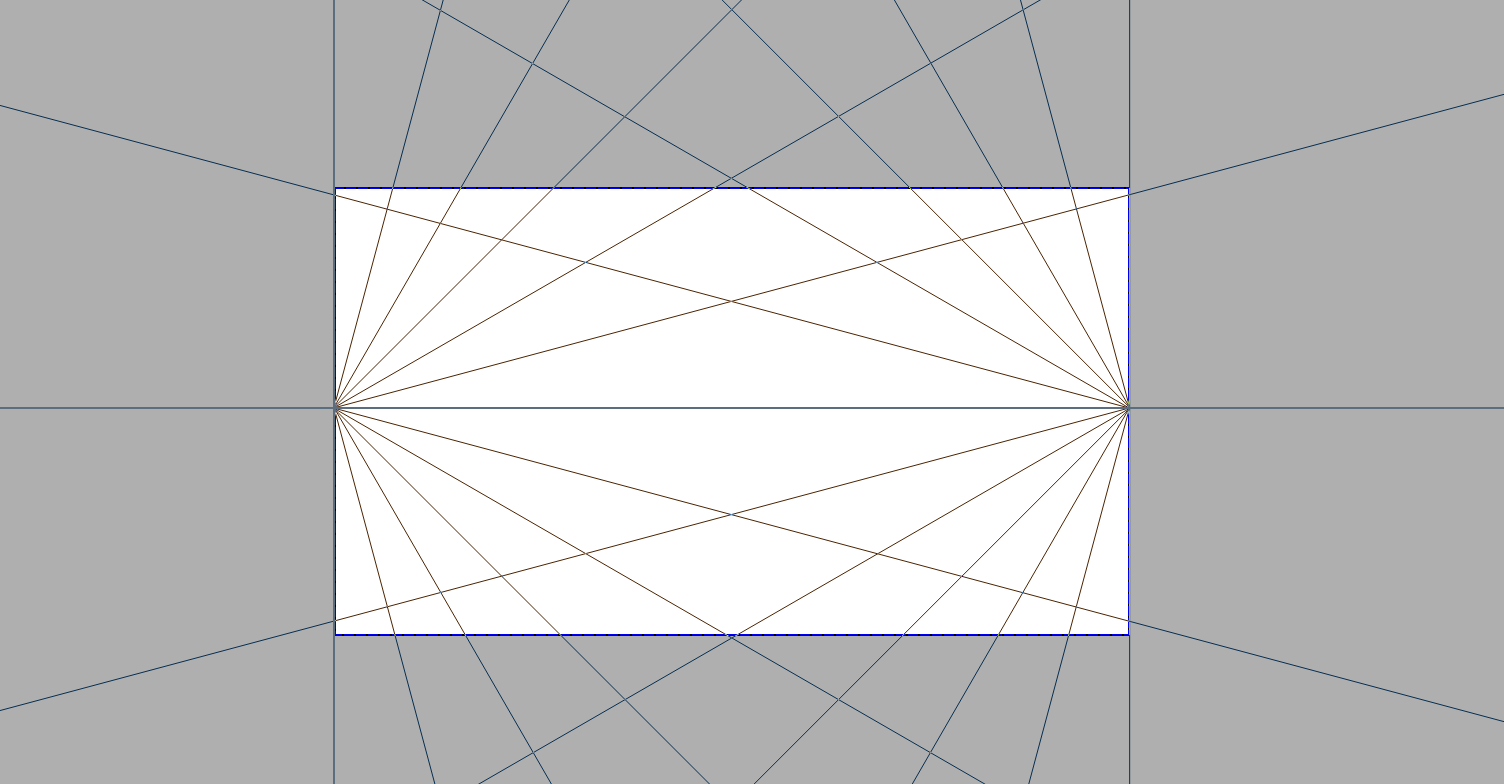
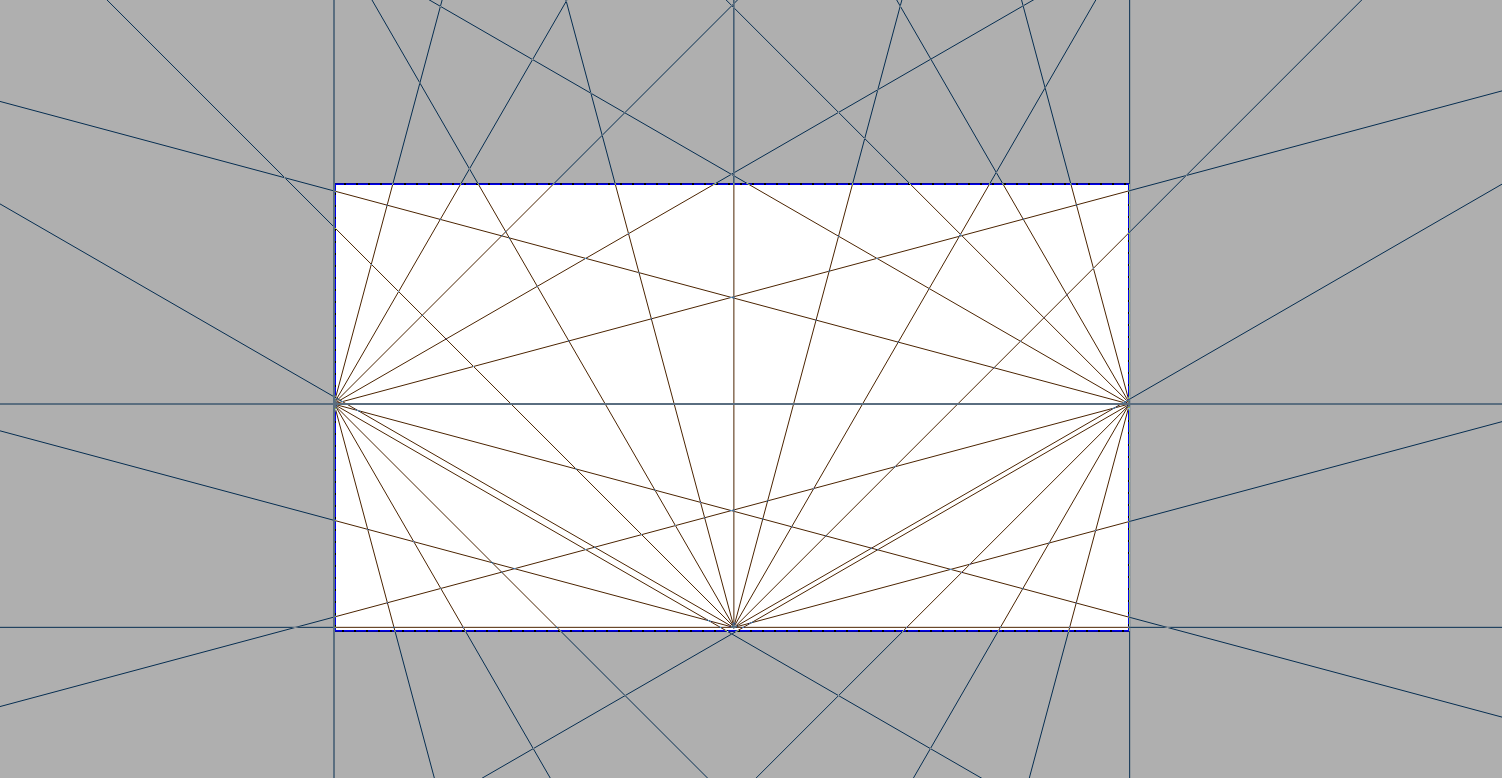
Perspective Grids! (#1352)
In addition to having various grid types for layout, we now also have the ability to enable one-, two- or three-point perspective.

| One point | Two point | Three point |
|---|---|---|
 |
 |
 |
| Interaction |
|---|
To interact with a perspective grid, select the move tool and move the dot appearing on top of one of its vanishing points.
Windows Installer (#848)
On Windows, Pencil2D has traditionally been distributed as a simple self-contained ZIP archive. This has a number of advantages, such as minimal impact on the system configuration, simple removal once you no longer need the software, portable use on USB flash drives, and the ability to easily switch between different versions of Pencil2D.
However, we noticed that this method of distribution also caused a number of issues, particularly for non-technical users who are not familiar with it. Some did not know how to extract the file, others were confused by the lack of a dedicated uninstaller, and many were greeted by frustrating error messages concerning missing DLL files.
To address these issues, we’re now providing an installer for Pencil2D, as many Windows users have come to expect from their programs. The installer will ensure that all the DLL files Pencil2D needs are available, file type associations and a start menu shortcut are set up correctly, and an uninstaller is available from the apps page in your system settings which allows you to easily remove Pencil2D when you no longer need it. Of course, the traditional ZIP files will continue to be available for those who prefer them!
Enhancements/Changes
Interface:
- Introduced a comprehensive new icon set - #1356, #1361
- Replaced the zoom text on the status bar with an interactive control - #1442
- Added help text for the currently active tool to the status bar - #1442
- Added toolbars for commonly used actions - #1468
- Improved layout of the onion skin tool window - #1589, #1753
- Changed the default export file path to the file path of the current project - #1657
- Removed vector layer from default timeline setup #1666
Please note that vector layers can still be added manually and the default layer setup can be customized by modifying the default preset in Edit → Preferences → Files. Existing custom default presets are not affected by this change.
- Added a warning when adding more sound clips than can be exported - #1701
- Added a warning when opening multiple instances of Pencil2D - #1702
- Replaced the display option window with a toolbar - #1734
- Improved error messages when importing images - #1750
- Added an abortable progress dialog when importing animated images - #1801
- Added support for importing animated WebP images - #1801
- Added support for importing and exporting static WebP images - #1801
- Improved usability and reliability of quick sizing - #1806
- Added an option to configure keyboard shortcuts to flip the current selection - #1816
- Improved zoom behavior for devices that report pixel-based scrolling data - 06a4495
- Added translations for Bulgarian, Persian, Korean, Norwegian Bokmål, Dutch (Netherlands) and Cantonese - #1826
- Changed the information dialog shown when changing the application language to display in the new language instead of the current one - #1836
- Improved the movie export dialog to prevent exporting MP4 files in an invalid resolution - #1833
- Improved the layout of the preferences dialog for languages with long translations - #1856
Bucket Tool:
- Added an option to set the fill reference layer - #1630
- Added an option to toggle tolerance on/off - #1630
- Added an option to expand the fill area - #1630
- Added the ability to drag to fill - #1630
- Improved fill performance significantly - #1707
- Added an option to fill using a blend mode: Overlay/Behind/Replace - #1590
- Removed nonsensical quick sizing support - #1806
Workflow Improvements
- Aligned color palette behavior on vector and bitmap layers so that palette colors and their associated vector strokes are only updated when the replace function is used - #1265
- Added an action to paste content from the previous frame - #1682
- Added an action to duplicate layers - #1690, #1744
- Optimized the peg bar alignment workflow by activating the select tool, creating an initial selection and pre-selecting the first layer upon opening the dialog - #1580
Behind the Curtain
- Optimized visual updates of the timeline window - #1737
- Improved painting performance by re-rendering only modified areas - #1761, #1789
- Improved painting performance by introducing a tiled buffer - #1776
- Reworked switching tools temporarily through modifier keys or right-clicking to be more reliable - #1675
Bug Fixes
- Fixed an issue where undoing after deleting a layer caused the program to crash - #1412
- Fixed an issue where certain user interface controls did not display correctly when using the Direct2D platform on Windows - #1575
- Fixed several issues where the canvas did not immediately update after performing certain actions - #1642, #1581, #1580, #1577, #1576
- Fixed an issue where undoing the deletion of a keyframe caused the program to perform an additional undo operation or crash - #1629
- Fixed an issue where the hand tool icon remained active after zooming with a stylus - #1633
- Fixed an issue where transforming areas in certain imported footage would color them black - #1642
- Fixed an issue where fill operations were performed twice when performed with a tablet - #1667
- Fixed an issue where the system language was detected incorrectly on systems that have secondary languages configured - #1703
- Fixed an issue where mouse wheel zoom misbehaved on some systems using the X Window System - #1716, #1711
- Fixed an issue where undo information was recorded improperly for the first change made after navigating between frames - #1717
- Fixed an issue where the project recovery dialog appeared behind the main window on some systems - #1721
- Fixed an issue where rotated selections boundaries were not visualised properly - #1724
- Fixed an issue where transforms were applied incorrectly to rotated selections - #1724
- Fixed an issue where the undo and redo shortcuts were erroneously disabled under certain circumstances - #1721
- Fixed an issue where deleting a sound layer on Windows would under certain circumstances lead to a crash - #1731
- Fixed an issue where playback of certain sound clips was truncated on Windows - #1733, #1756
Please note that in order to benefit from this bug fix in existing projects, it is necessary to delete and re-import affected sound clips with this new version.
- Fixed an issue where the use of valid file name extensions was not properly enforced in file save dialogs - #1736
- Fixed several issues where the timeline was drawn incorrectly - #1737
- Fixed an issue where dragging the timeline with the middle mouse button could inadvertently alter the frame selection - #1737
- Fixed an issue where tool windows briefly appeared and disappeared on startup before the main window was shown - #1737
- Fixed an issue where the follow camera image import option used the wrong transform and resulted in general inaccuracies - ebad47e
- Fixed an issue where opening Unicode file paths failed when the program was compiled against MinGW32 - eefd148
- Fixed an issue where the movie exporter sometimes failed to export sounds when exporting a range that does not start at the first frame - e9f72dc
- Fixed an issue where the movie exporter erroneously included hidden sound layers - b315f27
- Fixed an issue where importing vector layers from a project file did not preserve their original colors - #1798
- Fixed an issue where importing vector layers from a project file caused the program to crash - #1798
- Fixed an issue where exporting a movie did not prevent interaction with the rest of the program - #1801
- Fixed an issue where importing an image did not account for certain types of potential errors - #1801
- Fixed an issue where trying to import an image onto a hidden layer caused the program to crash if a keyframe did not already exist on the target frame - #1820
- Fixed an issue where trying to import an image onto a hidden layer did not produce an error if a keyframe already existed on the target frame - #1820
- Fixed an issue where opening the preferences dialog on a system using Wayland caused the program to crash under certain circumstances - #1856
- Fixed various memory leaks
Various
- Raised minimum system requirements of our AppImages to Ubuntu 16.04 “Xenial Xerus” or newer distributions - #1635
- Added support for Wayland to our AppImages - #1663
- Added update information to our AppImages - #1680
- Added MIME type information to .pclx files - #1698
- Improved robustness of project save/load logic - #1710
- Added compatibility with Qt 6 when building Pencil2D from its source code - #1743
- Clarified licence of certain files incorporated from the Qt Project - #1757
- Added a custom start menu tile for Windows versions that support them - #1787
- Added macOS builds for Apple Silicon - #1835
Please note that the current macOS release build targets the Intel architecture, but should run fine on Apple Silicon with Rosetta 2. We hope to be able to offer a universal binary with native support for both architectures in the future.
- Added safeguards to prevent loading resources from outside the project - #1843
Known Issues & Gotchas
Here is a non-exhaustive list of bugs that we are already aware of, but were unable to fix before this release. Rest assured, we will do our best to fix all of them eventually.
- The vector engine is a work in progress and does not work as intended. Much work will be required, please avoid using it for production.
- The information dialog shown when changing the application language may display without any message under certain circumstances.
- Panning the canvas by middle- or right-click-dragging with a tablet causes the application to misbehave on Windows - #1813
To pan the canvas using a tablet without triggering this issue, perform a left-click-drag while holding the space key. When the issue has already been triggered, perform a left-click on the canvas using a mouse to return the application to its original state.
- The command line export operation consumes more memory than using the editor - #1117
- Users of Huion tablets may experience lag and buggy strokes - #1133
To work around the issue, try disabling the “linear optimizer” option in your tablet’s device settings if it is available. For details, please see this forum post.
- Some users may experience perceived audio delay during playback, depending on the number of layers and frames in the project. Sound scrubbing and movie export are unaffected – #1567, #1179
- Using the smudge tool in default mode on bitmap layers adds a white background to strokes. This may cause unexpected results so please use it with caution.
- Using the smudge tool in smooth mode on bitmap layers by pressing Alt keeps smudging the pixels rather than blurring the image.
- Using the bucket tool to fill vector a vector stroke requires the stroke to be selected.
- Clicking to select a keyframe and then clicking it again to drag it will trigger the feature that creates new keyframes with a double click. You will have to wait a moment between clicks if you don’t wish to trigger this behavior. We will be reverting this behavior before the next release.
How Can I Help?
Pencil2D is developed by passionate volunteers in their spare time. You can become one too, there are many ways to help other than programming! Please visit the Contribute page for further information.